Friday, 14 December 2012

Hair Bobble/Clips Organizer

Whilst browsing through various online Forums for some inspiration during the last few weeks, I kept seeing wonderful hair bobble/clips organizers sewn by a lot of ladies. We have at least 5 girls with hair clip chaos at home and the idea of making each one an organizer did not leave my mind at all.

Now, due to Little Miss Madam that takes up the most of my time during the day, I didn't find the time when I was motivated enough and didn't find the motivation when some time slot did pop up, to design my own organizer. So I asked in a forum for some ideas or where you can find some sewing pattern. The answers were very helpful and the examples they showed all very beautiful and individual. In the end, I opted for a freebook, made available by aprilkind (in german). Again, I was very lucky: great pattern, instructions really well written and comprehensible.

So I spent yet another hour in our local fabric store, trying to pick out patterns and discussing the possibilities with one of the owners of the store. She advised to be bold and mix patterns and colours, but as these are meant for quite particular little ladies, I was not brave enough and tried to keep it a bit toned down.

One of the ladies is celebrating her birthday tomorrow and my son has been invited. Next to the 'main' birthday present we bought already, I finally tool heart and printed out the sewing pattern and got to work. Here is the result of my very first hair bobble/clip organizer:


Clips can be clipped onto the froggy band, bobbles tucked into the pockets at the bottom.

I am still not that sure with the pattern mix, though my husband let a 'Awww, that's sweet...' drop when he saw it. Maybe I should really just go ahead with the advice of the store owner the next time I pick out some things - which will be when I finally use up my rations here at home beforehand ;-)

Friday, 7 December 2012

Xmas Pressies & Prototyping

My mother and sister are quite surprised about me and my sewing machine this year. Especially since I am not a huge creative talent (give me instructions and I may produce something recognisable...). So when making the list of presents for the extended family this Christmas, I thought they would maybe like something I made especially for them. As both are out and about, come whatever type of weather, I decided to try my best with a loop scarf (okay, it seemed pretty easy as well). This was my first try with stretchy fabric as well.


I tried to get colours that a) suit them well and b) they also like wearing. I hope they will like them!! The sewing instructions are from Elbekind in german and I found them quite easy to understand.


My next prototype was the knotted hat for babies. It seemed pretty simple and the second one I made was easy and even fits (the first one was a tad too small). The instructions were a freebie from klimperklein, also very easy to understand and in german.


Now I am back at the machine. I hope I will find something else to try out!!

Another No-Sew Poncho

After one of my friends had seen the babywearing poncho I created last month, she asked if I could also make her one. Our Little Miss Madam had a longer morning snooze today, so I seized the opportunity to snip and snip at the fleece and out came this:


I hope she likes it. As it is, it's turned out a little bit nicer than the first one I made. The front has been left as it is, I would like to ask what she would like as an application first (if she wants anything at all, that is ;-))

Monday, 26 November 2012

Babywearing Poncho

To state that I have sewn something today would almost be a white lie ;-)

Time for DIY projects has been very scarce since our Little Miss Madam has arrived. After almost eight weeks since her birth, I have finally gotten around to making something practical yet simple (as stated: time is scarce).

To be completely honest, the weather forecast made me nervous and persuaded me to finally get a move on and buy some fleece. Snow is scheduled for the end of this week, even though we have hardly had a proper November beforehand, and we live at the bottom of a hill. Bottoms of hills have their advantages (like not having to climb back up the hill to get home after a good round of sledging), however, if the school is over the top of the hill and in addition to the child that has to get there on time, you also need to push a pram - well, some disadvantages also come with this domestic location.

It's good to have a baby carrier in such cases. And I for one love wraps. They're so versatile, compact and my middle one and Little Miss Madam loved to /love being carried around in one. The only problem was, that I have absolutely no winter jacket/coat available where Little Miss Madam will also fit into when being carried in the wrap.

I have spent hours browsing the net to find some sewing instructions for a babycarrying solution, thinking a poncho would maybe be a good compromise for the time being. Until yesterday I had only found babycarrier pouches for just around the babies (the solution for when you can get part of your jacket zipped) or babycarrier zip-in pouches (basically extensions for the jackets you already have). As my jackets are too short in order to just use a baby pouch and that I have not yet really dared to work with zippers yet, I was looking for instructions for a poncho. At the end, I only found two. The first one was one that I could have created on my own and almost settled for (hole in the middle of a piece of fabric, round the bottom if wanted and a second hole for baby's head) when I then found this amazingly simple, yet very effective guide on creating a No-Sew Babywearing Fleece Poncho.

So I went shopping at a discounter this morning, picked out two fleece blankets that I found nice, and used the napping time of Little Miss Madam to cut and knot. The poncho itself took just over half an hour but I thought it looked a bit boring. So it was then I decided to 'sew' for the No-Sew Poncho and created some butterflies for the front. This is was came out:


I am not really great with applications but I think I can dare to brave the outside world with this particular result. The 'purple flash' across the breast is the head opening for the baby. Now I only need to make Little Miss Madam a scarf for her neck - net browsing for this has already begun...

Monday, 13 August 2012

The Latest Creations á la Nessie

Despite the current impression I may be making by hardly updating my blog, I am actually doing something ;-)

The first thing I decided to try out was a so-called apron dress for my godchild. I hope it fits, it's a german child size 80 and has been sewn so it's a 2-way dress (is the material familiar to you?) :


This was the first item for which I bought a sewing pattern: Schürzenkleidchen. I found the pattern very easy to understand. The only fiddily part was to include the seam allowance for the two pieces of fabric. If you use just one fabric piece and rim the edges, you only need to include the seam allowance for the straps, however, if you would like to the sew the 2-way version, you need to plan in the seam all around. If you have sewn a few of these, I would guess that this is a very nice 'short time filler', as the basic idea is not very complicated.

The next project was the bedclothing for the pram in which our third child shall soon be travelling in. I am a fan of pillowed covering for prams and newborns. The baby will only be sleeping in a sleeping bag at home, but when going for long walks during the autumn and winter, I am a pillow fan. It's warm enough and it creates this cute buldge just over the top of the pram's rim (sooo cute!).

As we are still expecting a 'surprise', we needed some bedclothing that is quite gender-neutral (so similar to the draperies for the baby bed). As the pram is of olive-green colour, I opted for a light-gray cotton-stretch fabric, with an elastic black-white checked frilled finishing for the front side, just to set a small highlight. Matching the pillow case, a two-layered 'dribble cloth' (our second child really made use of these things, so I thought I would make some this time, just in case ;-))


Monday, 23 July 2012

Finally...

... finally, finally: the baby bed is finished! Well, the draperies at least ;-)

This has been the reason that I have not had that much to post during the last weeks. The material had been lying around, waiting for me to take up the challenge at last. I was a bit reluctant to start, as  my darling husband fell in love with the beetle material and so I needed to also use some material that would keep out the light to some extent - especially for the canopy. And all this without a pattern *eek*

Well anyway, after having finished the top trim of the canopy, everything else seemed to work fine. A few hiccoughs with the tunneling for the top bar (4 layers of material and only one tunnel will work after sewing it the way I did *rolleyes*). I did this during the evenings after work and when the kids were in bed, which meant that progress was slow.

Not so with the so-called 'nest' (the padded lining in the bassinet). I sat down to at least start yesterday. My husband bought me a cutting mat and a rolling knife for cutting material last weekend, so I thought, seeing as the kids are on vacation with their grandparents, I would just iron and cut the pieces of material needed for the nest.

Well, when that was finished, I thought it would be good to just sew the fabric together. Then the first disagreement with the sewn piece, however, I know know how to sew a huge two-lined fabric loop now - never again will I make those mistakes that I did yesterday.....

With the help of the almost Dad-of-three the padding was pulled through, the loop closed, two holes for the sticks belonging to the canopy and violá:

Friday, 29 June 2012

The Lunchtime Clothespin Bag

As school and playschool are shut, I am working in the home office today. During lunchtime, I thought I'd give a clothespin bag a shot, seeing as our old one was only planned to be an emergency solution that my darling husband wizzed up on the sewing machine a few years back. Now it's best days are over, I felt like sewing something completely new, so here it is:.
Yes, the fabric is familiar, but now I definitely only have a few scraps left over from the blue checks and the lorry fabric!
You can find some ideas in the internet on how to make one. This one is the one I was inspired by: Clothespin Bag Tutorial

Tuesday, 26 June 2012

The Next Batch of Jeans Shorts

So, after the first round of "Make Shorts Out Of Ripped Trousers", I finally was able to motivate myself in processing the next batch of ripped jeans. The sewing machine played up a little, which meant that I was spending more time threading and re-threading  than I was with the rest of the stuff (cutting the trousers to length, ironing, etc.

Anyway, here is the second batch (look a bit nicer than the first, at least!)

Monday, 11 June 2012

'Standard' Stuff

It felt like 100 hours that were spent in front of that sewing machine - and only because our youngest finally agreed that it was time to transform his ripped-at-the-knees trousers into shorts for the summer ;-). He has enough now for 3 summers and is still finding trousers for shortening ...

Saturday, 14 April 2012

Pencil Roll

I still have quite some of the material left over out of which the apron and the book cover have been made, so I browsed the web for some inspiration. I found this: Stifterolle This is a really great guide on how to make a pencil roll yourself, even I was able to get something done here!

I cut the fabric up and began sewing yesterday evening when suddenly my sewing machine started playing up. No matter what I did, the top thread kept getting caught with the lower thread and tearing. It was really annoying.

As I have not used my eight (!) year old sewing machine that much in the past, I never ever though of the idea that I should clean underneath the sewing plate or anything before. Yesterday was a first for me, however, the problem persisted. Lukily enough, I met a friend-of-a-friend this morning who is kind of a sewing expert and asked for her advice. This led to me oiling my machine for the first time ever and looky here: it actually worked!!

Finally, my youngest has his pencil roll (my eldest is still thinking of a smaller project he can give me for himself):


Not perfect but I know what to take care of the next time. Normally you tie these pencils rolls shut but I used velcro for this one. Nevertheless, son is happy with it and that is what counts!

Schwarzwälder Kirschtorte

It was my darling husband's birthday a few days back and as he is saving for a new laptop, he did not have many presents to unpack, instead he received some gift vouchers from me and the kids. To still make his birthday a bit special, the boys and I decided to try and make his favourite cake: a black forest gateau.

As the kids and I also wanted to assist the birthday boy with the diminishing of the cake, we opted for an alcohol free version. I followed (apart from the Kirschwasser) this receipe: Schwarzwälder Kirschtorte. Really great and really tasty and it was done really quickly (especially if you use the kitchen aid for whipping the cream).
About one hour later (the boys helped wonderfully) the above result turned out. My husband absolutely loved it and we were all pleasantly surprised that a gateau does not necessarily need to be a whole lot of work!

Monday, 9 April 2012

An Afternoon Spent Sewing

I had bought some cotton fabric a few weeks back, planning on making a cover for my youngest's medical check-up book. As I am no expert with the sewing machine, I bought more than enough cloth, just to make sure that I had enough 'chances' to get something that went right.

This afternoon the boys and my husband decided that they would build a Lego city, so I thought it would be good to give the book cover a try.

To all our surprise, the first try worked straight away. As of now, the check up book has a nicer cover than it did before:


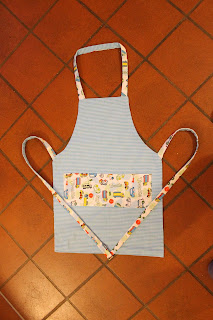
Now I had a lot of cotton fabric left over. And quite nice ones to say as well: small blue and white checks and the other one with cute trucks on a white background. My darling hubby then mentioned - in front of the kid - that the cooking apron we have for our 6 year old no longer fits, I could try and make him a new one. My youngest thought the idea was great, so I told him that I would do my best.

The next few hours were spent with ironing the cloth, cutting out the different pieces of the apron, ironing them again, threading and rethreading the needle of the sewing machine, tiding up stitches, ... etc. Pretty soon I decided that I would give the thing a real try and sew him a reversible cooking apron with a double pocket on the front. The different sides of the apron are in 'negative'. Finally the last stitch was made shortly before my son's bedtime. It fit's great. The loop for the head is a bit large, but smaller and he would have not got his head through properly. A small knotted loop at the back of neck fixes that though. The rest seems to be fine. My son is really happy and my husband and I are positively surprised that the apron has no reason to hide ;-)


Saturday, 7 April 2012

Easter Lambs

Tomorrow is Easter Sunday and, according to various traditional things here in Germany, you should actually go an visit your parents, siblings, etc.

My mother- and sister-in-law are also celebrating their birthdays tomorrow but both stated that they do not want presents. My parents have invited us for dinner (hmm, lovely roast!!). So I decided to follow another german tradition and bake some Easter Lambs to take with us, along with bunches of flowers, as small pressies instead.

After succeeding in the last-minute Easter shopping chaos in the town's largest supermarket, I started to prepare the mixture for the Easter Lambs. The sponge is not as light as a typical british sponge, but it is certainly going in that direction. Very easy to make and very tasty!! Instead of ground hazelnuts (which is quite common for the Easter Lambs here) I used lemon zest in order to give the sponge a nice lemony flavour.

I only have one mould for the lamb, which I bought years ago, only to never ever use again, as all baked lambs were headless after taking out... Browsing the internet this year helped me though. Apparently it really helps with not only greasing the mould very, very well (which I did all the times before) but also with then covering the inside of the greased mould with very fine bread crumbs. Believe it or not, this actually worked! So I greased and crumbed in the mould three times in total to bake three ladies an Easter Lamb each.

After they had cooled down they need to be covered with powder sugar. Lately it is also quite 'in' to cover the lambs in chocolate or coconut flakes instead but traditionally it's really only powder sugar let loose on the lamb. As you cannot really wrap them up in gift paper, I placed each on a paper bakery tray with green paper grass (normally used for the german Easter nests) around the lambs.  Each lamb then got a light green ribbon around it's neck and the whole thing was then wrapped in cellophane and topped with a ribbon.


I hope our families enjoy the Easter Lambs. I am certainly happy that they worked out well!!

Friday, 6 April 2012

Day Trip to the Discovery Center

Today is Good Friday and like all Good Fridays in Germany, everything is shut. Not even the cinemas are open.
So like all Good Fridays we decided to take the opportunity to have real quality family time and go on a day trip that everyone of us would enjoy. After thinking long and hard about this and having the one or other short discussion on whether or not a suggestion is a good or bad idea, we all agreed to cross the border to the Netherlands and revisit Continium in Limburg, NL:

Clicking on the image will redirect to Continium homepage.

This user to be a Technology Museum but a few years  back they decided to change it into a Discovery Center. It's great for all people interested in science and technology. This center is so great because it's explicitly wanted that the guests try out the experiments, games, etc.. Great for the kids to have a hands-on experience with science and  technology. And it's extremely children-friendly!

 You have two main areas in Continium: the standard experiment and exhibition zone and the changing exhibitions.
In the standard area you have main themes in which the displays and experiments sometimes change but without any special regularity. It's fun each time you go in there though. There is also a Hall of Fame in which the most special objects are put on display in a huge room for themselves. These mainly have something to do with the main theme of the standard area. Today it was mining and Dutch porcelain.
The changing exhibition area is currently under the motto Get Smart - entertain your brain. It was amazing. A lot of mind games, puzzles and great experiments that show you that your brain is far more complex than we would ever dream of. My favourite experiment was the revolving tunnel. You had a few steps to a bridge that lead through it's center - not moving one inch. The inside of the tunnel was painted with black stripes and the tunnel itself was revolving around the bridge. Nothing very fancy from the outside but one step into this tunnel and I was hanging onto the bridge railing. I could not believe this, how an optical effect could influence your sense of balance that much that it doesn't matter if you know that the ground beneath your feet is not moving - you will continue to topple over until you close your eyes.
That's not all there is to continium. There is also a theatre area in which various topics are presented to the visitors, a 3D cinema that shows short documentary films  (for example on dinosaurs), a small restaurant for a snack inbetween (also with the possibility to sit outside and with a small kids playground) and of course, The Lab.

Today we finally had enough time to let the kids select a lab packet. Our 10 year old selected glass engravement and our 6 year old chose to build a morse code buzzer (it's louder than our fire alarm ...). ,
Anyhow,  after selecting their packet, the boys were handed out their building boxes and we all took a seat at the lab tables. The whole process of building the morse code buzzer and engraving the glass were explained in word and with pictures, making it really easy for my pre-schooler to see himself what the next steps in the building process were.
These packets just took them about half an hour but there are many more to choose from. They are all sorted for certain age groups so the kids have enough to choose from and there will almost certainly be at least one thing that they would like. Some of the packets I saw today was Monster Slime, Hair Gel, Wall Clock, Solar Powered Fan,... taking everything from about 30 - 90 minutes time to complete. The best thing about this though is that you have everything you need for such 'mini projects' available at once and you don't have the superglue marks on your own kitchen table ;-) The kids are as proud as punch with their work!

The discovery center was not that full up with people today, probably because it was a normal working day in the Netherlands. But there were two childrens' birthday parties being held there: one for the age group around 7 and the other one we met in The Lab were about 12. It was a great day out for all of us - parents included - and will not be the last visit to Continium!!


Harry Potter and the Chamber of Secrets, J. K. Rowling

To be honest, reading about the availabilty of Harry Potter eBooks via the Pottermore Site in a german tabloid really tipped the scales in favour of me buying an eBook reader. After over a year thinking "shall I, shall I not", I marched into the next retailers and bought myself a really good one :-)

Two hours later and with a very bemused husband sitting next to me, I was the proud owner of all seven of the Harry Potter books in eBook format - and in english!!!

A side note to the english editions of Harry Potter - even though there are more than enough pages to read, I finally now have the proof that the British can keep themselves shorter than the Germans ;-) Almost 100 pages less to read compared to the german translation... My son says that's cheating. I say that's fair. German is his first language, english mine, so we're square now...

Back to the book:

I did see some of the world outside last weekend - just not as much as I normally do. I grabbed the eBook reader every minute I could spare and had finished  Harry Potter and the Chamber of Secrets (Wikipedia Link) by Sunday! Please take into consideration that I have kids, a husband and a life, so I couldn't allow myself to stay on the couch all of Saturday to have it finished on one day - even though I would have loved to after starting with the book.

Sequels tend to have a hard time living up to the expected standards of the reader, especially if the previous story was really, really good. Well, it did definitely not make the impression that J. K. Rowling had a hard time writing the second part of the Harry Potter series! I enjoyed this read even more than the first! Admittedly, I am not really sure whether or not it is due to the first read in english or due to the story. Whatever the reason - thumbs up all the way from me!!

Harry Potter and the Philosopher's Stone, J.K. Rowling

After my then 9 year old read his first Harry Potter book, he was sooo fascinated and  definitely caught the Harry Potter bug. "Mum," he kept pleading, "you just have to read these books". After my normally football-crazy son starting wishing for bookshop vouchers from his friends for his birthday and started getting panicky when a book neared it's end after bookshop opening hours, I started getting curious. Even his teacher was thrilled with the sudden interest the boy was having with reading...

My son was really excited to finally hand me over Harry Potter and the Philosopher's Stone (Wikipedia Link I will refrain from summarizing the contents due to the book's immense popularity)-  in German. First of all, I was quite sceptical, as books in German tend to not really get the point across after translation from a foreign language. However, this first book in the series managed to get me through a flight from Frankfurt to Krakow with almost forgetting I was sitting in a plane (and for me, that is definitely saying something!!)

I used to love stories like this when I was a child and reading this book managed to revive the feeling of these times quite vividly. It was really surprising to see how a completely fictional and far-from-the-truth story could have me just as 'caught on' as my 9 year old son! Seeing as I have quite high expectations on the storyline as well, it was a welcome change to have a read over 300 pages and not really experiencing a single "drag" reading section throughout the whole book.

This was the first read of the Harry Potter series for me, it will definitely not be the last.
No-one was more surprised about this than I was...

My first blog entry!!


After being inspired by reading many really good blogs the last weeks, I have decided to take the plunge and also dive into the world of blogging.

I'm looking forward to this and hope that I get the hang of this quickly ...