Wednesday, 30 January 2013

Keeping Warm and Reflection

A while back I did make myself a No-Sew Poncho out of two fleece blankets that I purchased for almost nothing at all (see the Baby Wearing Poncho blog entry). A friend of mine asked for me to also make her one, only without the baby head opening and was thrilled to bits when I was done. However, you see, she has two daughters around the age that my boys are. And they also really loved Mum's new poncho. So guess who turned up with a few yards of fleece and asked if I minded letting the scissors dance one more time?

The older girl is already my height and stature, so I took almost the same measurements for the fleece rectangles as I used myself (2 pieces, one piece 1m x 0,7m) but I am really wondering if the one for the smaller girl fits as well. She's about 1,30 so I shortened the fleece rectangles to 0,8m x 0,5m.


And as the evening was quiet and peaceful, and my darling husband was watching TV, I eventually tackled a really mini project that has been waiting patiently since at least 6 weeks:

Whilst bringing Son #2 to school in the morning, I noticed that our pram for Little Miss Madam is not really seen by passing cars. Not soooo bad, as the school bag has some reflecting parts and Son #2 always wears a reflecting cover over his jacket (on school orders, the kids were all handed out one at the beginning of autumn), but on the way back and on rainy days I had to be especially careful. There are some reflecting ornaments near the handle of the pram, but nothing that is that noticeable.

So 6 weeks ago I bought some self-adhesive reflection material from the local fabric store and some popper buttons and since then, nothing much has happened.

Last evening I went through the old clothes that I normally bring to the old clothes containers, just to see if there was anything worth recycling and found and old body warmer, which had a nylon cover on the top side. There it was, the material I needed, and time to sew, so no excuses anymore.

I measured around the parts that I wanted to attach the material to, added 4 cms to the length and width for the nylon rectangles and attached the popper buttons. Then the reflecting material was cut to size and stuck on. Viola, the result:


The test run today was a great success! It really does make a difference!

Monday, 28 January 2013

Costumes & Hats

I finally decided that the flower costume for my niece really did need a hat and the idea of keeping the petal form in the pattern did appeal a lot to me. So I made another paper template for a larger petal (20cm in width) and used the same coloured fleece as I did with the petals for the cloak and cut out three different coloured petals. All three were sewn together close to the edge, nice and tidy in order to be able to flap over the rim if needed. I personally think that you can wear the hat inside out as well, seeing as the seams are neat and tidy: fleece is always great for 'outside seams'.

The finished hat was soooo cute that I promptly decided to make one for Little Miss Madam as well. This time the width of the petals was 16cm.


And another costume was made: a 'bunny' skirt and legwarmers for the daughter of a friend. I am to make an angel costume for her other daughter as well.... I'm a bit scared of that upcoming project, to be quite honest! But here is are the bunny utensils as ordered (ears and tail have been purchased already).
The skirt is a really basic one (rectangle cut to size, tunnel for elastic and then sides sewn together). The legwarmers were sewn in the same way. As with the 'flower garden' fabric, this furry fabric was really rubbish to be sewn with the machine, so the tunnel for the elastic band was also sewn by hand. Tomorrow is fitting time!!

Friday, 25 January 2013

A flower garden ...

A friend of mine also asked me to sew her a carnival costume. She's going to one of these carnival events where only ladies are admitted and asked for a flower garden.

She bought the fabric, I was responsible for the creation. The grass-like fabric is lovely and soft but rotten to sew.

An ultra mini was wished for, no more than 40cm please. And 40 she got ;-) the tunnel for the skirt had to be sewn by hand as the sewing machine choked with the feathery fabric being pulled through but the seams were no problem - apart from being 'slippery' and me having to watch out while sewing.

The flowers were bought separately, I only had to find a way of how to sew them on. The smaller one's were easy, I just had to sew right and left of the flower center. The larger flowers were more difficult: they were heavy and did have a different center, so I had to dismantle they flowers and sew some of the petal circles on instead.

The leg warmers were sewn similarly, only with a smaller width *gg*

I hope she likes the costume!!

Wednesday, 23 January 2013

How the sewing began: Bird Costume

As mentioned in a previous post, I made son #2 a costume for last year's carnival. It was a very stressful experience for me, as before I avoided the sewing machine like the plague before then. After having finally finished the costume and seeing son #2 thrilled to bits, I decided that it was time now to get a better grip on things regarding sewing with the machine.

The bird costume was made out of teddy fleece and felt feathers. The mask was a decorated Zorro mask with an egg box  beak ;-)


Little Flower for Carnival

My sister phoned up to ask for a favour: could I please, please, pretty please make her little one a carnival costume? All the ones you could buy for 1 year olds were not her taste. If possible, something to do with flowers...

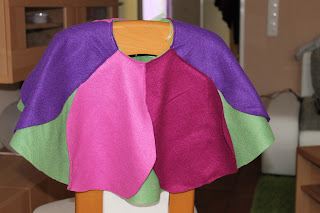
I still had some 'girly' coloured fleece left over from the ponchos and also a new green fleece blanket. So I had a go and tried to make a flower costume for my little godchild:


So, it's completely made out of fleece apart from the ribbons, they are chiffon ribbons in light green (that I had left over from the invitation cards for our eldest's 1st Holy Communion).
The basic cape is a circle with a 32cm radius in green, with a circular opening at the top (5cm radius) and a cut from the neck opening downwards (10cm). The ribbons have been sewn to the cut opening first with a medium zig-zag stitch.
6 petals in 3 different colours were sewn firstly to the neck part and secondly on the 'overlap' of two neighbouring petals, about 10cm down in length.

I am thinking whether or not I will manage to make a smaller hat/bonnet to go with the cape as well ... But first of all, my sister has to give the all clear!

Monday, 21 January 2013

Carnival Costume: An Elf from LotR

My eldest almost never ass for me to make him things. This was one of the seldom cases where it did happen.

Carnival in North-Rhine Westfalia is a huge event. I personally think it is great for the kids to get dressed up and all that, however, I still find it strange that the adults are also carnival-mad. But I am getting used to it ;-)

Son #1 always has special wishes with regards to his dressing up. And this year he has decided to go as an elf from LotR. It didn't have to be exactly like Legolas, he assured me, but it should definitely go in this direction.

Our local carnival store (which is really, amazingly enormous!) didn't have such a costume but unfortunately had the ears. So son asked...

As I made son #2 a bird costume last year, I couldn't really say no this time either. This was the first project with 'clothes' that had arms, waistbands, where I made my own paper cuts and puzzeled and designed. All in all it too me one weekend for the basics and another afternoon for the smaller things, here are the results:

 The tunic
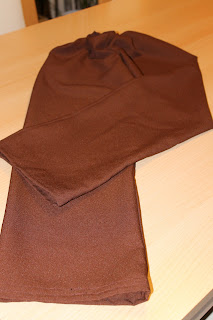
 Basic 'elastic' trousers
 This things that archers wear on their lower arms
 The cape, ordered with arms but to be cut so it stays at the back when wearing
 Bag for arrows (son #2 broke the bow, we have to see that we get another one before carnival) and a basic knotted belt

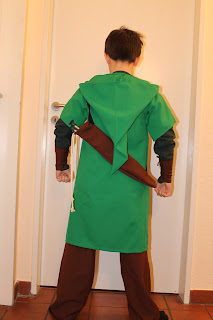
All together from the back
All together from the front-slanted perspective (he's a little poser, isn't he?!)

Thursday, 3 January 2013

Organizer/Pouch for the Ladder Bed

See, my middle-one wished for a 'grown-up' stereo for Christmas. And seeing as he had no other big wishes, hubbie and I decided he would get a nice, easy to use one as his big Christmas present.

A remote control was included in the package, much to the delight of our son. But then he was quite concerned as he had no place to put the remote control after having gone to bed, without needing to climb back out of bed. So the question popped up: "Mum, can you make me something?"

As he also has a small torch for when he has to get out at night and is also discovering the joys of reading for himself, I decided to try for a basic organizer that can be attached to the side of the ladder bed and has room for all.


I may need to shorten the straps of the organizer a bit, but will wait and see  how it proves to be in 'nightly' use before I do so.

The middle-one picked the fabric, I backed it (and filled the pocket) with mollitan to give it a bit more stability. It was also the first time that I attached poppers with the clamp I have here at home and must admit, it needs a bit of practice ;-)